http://www.ia470.com/primer/scenery.htm
Scenery
Many methods used to assemble and shift scenery.
Wing and drop: an old method, wings are legs painted like drops. To change the scene, one set of wings, drop, and border are flown out and another set flown in. This system is still common in opera and ballet.
Gripping: simplest way, just close the curtain and send the grips out to pick up set pieces and carry them off. Requires a certain amount of practice to do safely, so that the large set pieces don't upend while being moved.
Flying: Scenery is sometimes rigged to fly on battens like curtains. This can be too heavy a load for a single line set; two adjacent batten may be chained together or "married", with the counterweight for the load divided between them. Add weight evenly to both arbors until the load is balanced.
Flats are assembled into scenery using a variety of methods, depending on the nature of the show.
The simplest type of flat show involves using a single set for the whole show. Flats can be attached to each other for the duration of the run. For a straight wall, flats are connected using battens.
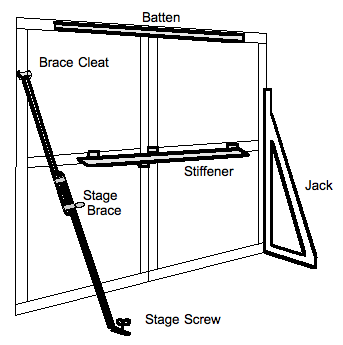
Battens : simply boards, 1x3 or 1x4. If the wall is not too large, lay the boards flat on the back of flats and screw battens to frame of the flats with drywall or utility screws.
For taller and/or heavier flats this is often not stiff enough.
Stiffener : To make battens stiffer, place on edge instead of flat, and hinge to flat frames. Alternate hinges on both sides of the batten so the batten doesn't fold over. Used this way,it is called a stiffener, and may be used horizontally or vertically as needed. Hinges used are backflap hinges, which have a larger surface flap than other types.
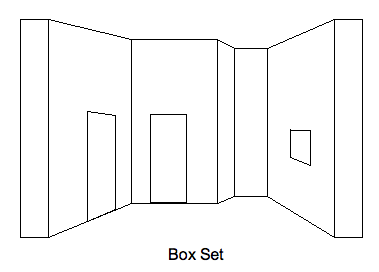
BOX SET: a set that wraps around playing area on three sides, resembles a box with one side removed. Naturally it uses corner joints.
When a corner is assembled to make a box set, the attachment used will vary with Angle.
*From 90 degrees to about 45 degrees, screws or nails can be used.
*If corner is flatter, screws or nails will likely split wood and not hold, and so hinges may be more successful.
The walls of a freestanding box set must be supported in some way. If there are sufficient corners, the set can hold itself up. Long flat walls must be supported some other way.
Two most common bracing devices: jacks and stage braces.
- JACKS: triangular frames attached to back of flats, usually with hinges. May the be anchored to floor by a hinge, by screwing through into a wooden cleat fastened to the floor, or with a weight (as a stage weight or closed sandbag) placed on jack to counterbalance weight of the flat.
- STAGE BRACES: adjustable sticks with hook at top and foot at the bottom. Hook is attached to a brace cleat on flat and foot is attached to the floor with a stage screw. Brace is then adjusted so flat is vertical.
Stage screws:
Improved stage screw: designed to overcome this problem. Has square threads which engage inside of threaded insert. Outside of insert has knife threads to engage the wooden floor.
To use, pilot hole is drilled into floor and the insert is screwed into floor, usually with a brace and a special screw bit. Stage screw then screws into insert.
Disadvantage: improved stage screw requires more effort to install,
Can be used almost indefinitely without stripping out floor.
Leaves a hole in floor when insert is removed, but this can be repaired with dowel and glue.
The hole from a traditional stage screw tends to close up when the screw is removed, as no wood is actually removed while installing.
----------------
Scenery that shifts:
A play using multiple box sets requires different assembly strategies so that sets can be quickly put up and taken down, yet still be secure in use.

Traditional approach, somewhat uncommon now: specialized stage hardware used with #8 cotton sash cord to lash flats together.
Requires lash hardware:
- Lash eyes- these are placed on the top left hand flat as you face the back of seam. They go on this side because most people are right handed. The sash cord passes through the eye and knotted with an overhand or figure-eight knot.
- Lash cleats- spaced alternately down the flat joint, these are designed so the rope can slide over them when you pull them tight.
- Tie-off cleat - this is designed so the rope doesn't slide when you pull it tight.
- Stop cleat- These are placed to prevent the flats from sliding past each other when a corner is made.
To use, the flats are butted together, and the rope is flipped alternately around the lash cleats, then tied off over the stop cleat with a lash line tie-off knot that holds under pressure, but which can be quickly released to shift.
Alternate approaches:
Instead of lash hardware and rope, other methods commonly used today:
- Loose-pin hinges: hinges with removable pins. Pin wire is used instead of the stock pin as it is smaller in diameter and places more quickly. Can be bent over slightly so it won't fall out, then straightened for removal. Quick and secure, but requires a ladder to set top hinges.
- Roto-locks or coffin locks: also quick and secure, but also requires a ladder as well as 5/16" Allen key. Coffin locks pull joint together, but add to overall thickness of flats in storage.
- Instead of sash cord, aircraft cable can be substituted and end secured with load binders to a ring or hook. Stronger than rope, but requires more equipment to install.
Two-fold and three-fold: two or three flats hinged together and folded for storage. Two flats folded is a "book flat". Three flats folded is a "three-fold". Because of the thickness of the middle flat, three-fold must be either Z-folded (not usually possible) or must be assembled with a tumbler or tumbling stile.
When book flats and three folds are opened, they can be stiffened several ways.
- Can use standard stiffener with loose-pin hinges to be unpinned and removed.
- Batten can be bolted with single pivot bolt, and the batten rotated into place.
- Batten hooks can be hooked over toggles and a batten dropped into hook.
Wagons
Wagons: standard platforms with castors attached.
Castors come in two forms: Swivel and Rigid.
- Rigid castors: track in straight lines.To work properly, MUST be parallel.
- Swivel castors: used when they don't track in straight lines.
Standard platform is 4' x 8' because of plywood size, often too small to be practical, so wagons and platforms are generally assembled into larger units.
Bolting with carriage bolts. 3/8" bolts most usual.
Rotolocks or coffin locks: used for road shows and when bottom is not accessible for assembly:
How to get castored wagons to go where you want them:
Wagons may be gripped, pushed on with push poles, slid in tracks.
Gripping: grabbing the wagon and moving it manually. Best accomplished behind closed curtains.
"A Vista" shifts (in sight of the audience) require somewhat trickier techniques.
Push poles: simple and effective, attach push pole and shove platform out into view. Limited mostly by length of the pole; as a practical matter usually used to move platform out about 8 to 12 feet.
Works best for smaller platforms.
Larger platforms require more elaborate arrangements.

Tracked wagons use guides to make sure the wagon goes where you want it.
- Rails may be bolted or screwed to floor. May be battens or angle irons fastened in parallel rows. Platform slides between them.
- Angle iron may be layed with the V up, and V-wheeled castors used to roll on them. This give less to trip on, but there is still some obstruction. Also, ONLY works with the v-wheel castors.
Knife slots.: slots in floor with metal bars or knives on wagon that fit into them. Requires a deck with slots cut into it; often involves installing a full deck over the regular stage floor.
May work better, but is much more expensive and more labor intensive to install.
Turn table: specialized platforms using rigid castors arranged in arcs around fixed pivot. Several scenes can be set up on them, then rotated into view in turn.
Turn tables require some sort of drive to operate.
- Small turn tables may be turned manually.
- Larger tables can be:
- Belt driven: motorized and cranked winch.
- Pressure wheel driven: motorized
- Gear driven: motorized.
One aspect of wagons is making them NOT roll in use. This can be accomplished with:
- Locking Castors
- Pinned in place: using
- Various fence gate locks
- Barrel bolts.
- Cane bolts.
- Wagon breaks. Work by raising wagon off the castors onto the break.Must be adjusted so they don't raise the wagon too far so as not to tilt the set or lift it out of its track, yet still provide enough friction to hold.
Moving wagons:
Sometimes such wagons are operated by motors and winches using computer controlled automation at one extreme, and by manual operation at the other.
Slip stages: huge wagons taking up large parts of stage, which slide in from the wings or from upstage into position. Slip stages require similarly large offstage storage spaces.
Jackknife wagons: used where there isn't enough room for slip stages. Pivot in on one corner. Two may swing together to meet in the middle.
Turn tables: large round wagons that turn on a pivot. Two or three settings are set on the turntable, and the table is turned to reveal each in turn.
Doors and Windows
Two very common scenic elements are realistic doors and windows. To be successful, they must look realistic and work every time. Unlike REAL doors and windows, stage doors and windows cannot depend on the walls they are mounted in to hold them together quite as much as real units, but neither do they have to be weather tight.
A door unit consists of the door and its frame. The door itself if called a shutter.
Shutters may be constructed as solid core, hollow core, or as panel doors with various numbers of panels
Doors can also be described by form. Most doors are one-piece doors, but there are also Dutch doors, French doors, folding doors, bi-pass sliding doors, and pocket doors.
Doors come in standard sizes. Household doors are standardized at 6'-8" high, while commercial doors are 7'-0" tall. Widths are generally in 2" increments, ranging from 24" for closet doors, to 36" for front entrance doors, and in between 30", 32", and sometimes 34" for interior doors. The standard height for doorknobs is 38" above the floor.
No matter what the door type, all doors need frames. Frames have several parts. The jam is the inside frame that boxes the thickness of the wall, to which the hinges and lock catch are attached. The casing is the surface trim that covers the gap and joins the jam to the wall. The board across the bottom of the frame is the threshold. The thin boards that stop the door from swinging in too far are, naturally, door stops.
Door hardware consists of the hinges and the lock. The hinges usually used on doors are butt hinges. These are taller when closed than they are high. Locks are inset into the opposite edge.
The most common lock today is the cylinder lock. The lock mechanism is set into round holes bored into the edge of the door.
Older doors often used mortise locks. These fit in rectangular hollows bored and chiseled into the edge of the doors. They require more work to install than cylinder locks, in that the hole is more exacting to make. They are still available for existing doors, but are rarely used in new work.
Old passage doors, especially in more modest homes, were often too thin to use a mortise or cylinder lock. For these doors one uses a rim lock. These are installed on the surface of the door, usually on the "back" side of the door. Since the back side of a door usually is not seen by the audience, rim locks are very useful in theatre, as they can be installed on a door more quickly than any other common door lock.
No comments:
Post a Comment